Brute Tested Tough TKX
5-Speed Performance for your 1963-1982 C2 / C3 Corvette
MDL Quick Tech
By Jim Smart
Just imagine a five-speed transmission that easily handles 8000 rpm shifts for your C2/C3 Corvette.
For years, the best you could hope for was the venerable TREMEC T5 and with some modifications to get it to fit the Corvette.
However, the T5 has limited torque capacity if you’re planning real power.
Modern Driveline introduces the shift-tested-tough TKX for C2/C3 1963-82 Corvettes, which is capable of handling 600 ft-lbs of brutal torque.
Hit the pavement at speed for a little road work with more power and real durability at your backside.
Choose the MDL TKX
The Modern Driveline specially modified TKX for C2 and C3 Corvettes delivers 500-600 lb-ft of torque capacity, along with smooth shifts and the wonderful efficiency of overdrive for the interstate.
The TKX five-speed transmission offers the perfect blend of brute strength and excellent street manners, which is why more classic Corvette owners are opting for the MDL Side-Shift TKX as the five-speed manual transmission of choice over more than all of our competitors combined.
Not only do you get outstanding quality, but you also get technical support like you will never have from any of our competitors.
We are enthusiasts and engineers here to serve you.
The TKX is based on the performance-proven TKO 600 five-speed transmission.
It shares mounting dimensions with the TKX from a crossmember to bellhousing dimension as well as the mounting pad dimensions at the rear of the TKX.
TREMEC stepped up durability and smoothness with the TKX close-ratio five-speed to replace the “TKO” as the best five-speed transmission for your money.
For those with a 3.50:1 axle ratio or higher, the TKX with its 2.87:1 first gear and .68:1 (31%) fifth gear overdrive provides low rpm cruising speed for the open road. And, when speeds become more conservative in the mountain twisties, you get user-friendly gearing that keeps your engine in the powerband.
TKX Quick Facts:
- Close gear ratio (2.87, 1.89, 1.28, 1.00, .68) for high-performance applications. The TKX, for example, is rated at 600 ft-lbs of torque.
- For the C2/C3 Corvette, you get a cool, comfortable low profile side shifter that aligns the shift lever in the stock location without cutting the floor.
- Fits the classic C2/C3 Corvette perfectly.
- The TKX utilizes the same bolt pattern as GM Muncie’s four-speed bellhousing.
- It offers a mechanical or electric speedometer drive built-in.
- This is a rugged transmission design with a brute strength internal three-rail shift system and cast iron shift forks.
- Tapered roller bearings on input, output, and counter shafts improve performance and reduce noise.
- it features the triple cone synchro rings from the T56 Magnum series 6-speed.
- All gears and shafts are made from special grade steel (ASTM 4615) that permits increased torque capacity. This box rocks!
- Single-piece countershaft that handles increased torque carrying capacity without breaking a sweat.
- Cruise control neutral safety switch is included along with a backup light switch.
- You get a 26-spline input & a 31-spline output shaft for added strength.
- Reduce engine rpm in overdrive to a level that makes it fun to drive besides enhancing the fuel efficiency
MDL has everything needed to get TKX performance into your C2 or C3 generation classic Corvette.
Crossmember modifications are required, which is straightforward if you follow MDL instructions to the letter.
We offer a flange kit for Manul cars to reconnect the cross member after the installation of your transmission.
a custom MDL driveshaft designed specifically for the C2/C3Corvette.
The TKX is a brute performer that can take 600 ft-lbs of torque.
remember:
The TKX is based on the performance-proven TKO 600 five-speed transmission.
It shares mounting dimensions with the TKX from a crossmember to bellhousing dimension as well as the mounting pad dimensions at the rear of the TKX.
Close-ups of the TKX modified shifter position for ideal OE placement.


As always, we’re opting for AMSOIL Manual Synchromesh transmission fluid, which greatly reduces wear and tear.
Our own specialized hydraulic clutch system makes light work out of shifting because the pedal effort is minimal.
The MDL clutch master cylinder goes right where your Corvette’s original clutch pedal pushrod was located.
The under-dash clutch linkage is straightforward and ties directly to both the clutch master and clutch pedal arm.
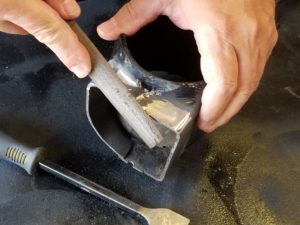
The stock transmission crossmember has been cut in two places to free up the central crossmember.
Specific measurements for the cuts can be found in your MDL instructions.
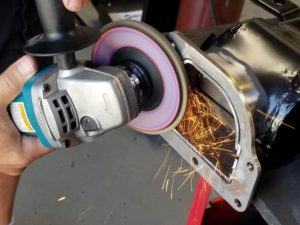
The crossmember tips are dressed with a file and cleaned up for welding.
All paint or powder-coating must be removed for welding.
There are two plates shown here. One gets welded to the removable crossmember while the other is welded to the existing frame member.
The two flanges (each side gets two flanges) are bolted together for permanent welding to the frame member and removable crossmember.
The removable crossmember and plates are positioned as shown with both flanges bolted together for spot-on accuracy.
The left flange (white arrow) is welded to the existing frame (left side shown here). The right flange (black arrow) is the MDL removable crossmember.
Getting the removable crossmember perfectly aligned with the existing frame members is a challenge. Your patience and tenacity are important.
The crossmember and flanges must be perfectly positioned and checked for proper alignment.
John has dressed and cleaned up the frame members. As a measure of caution, he has tack-welded the flanges just ahead of a fit check.
Tack-welding is suggested ahead of the test fit to give you the option of making changes to fit and to prevent distortion from excessive heating of the steel.
Once the proper fit has been established, John puts a solid bead on the flanges.
Flanges and frame members are cleaned up and readied for permanent installation.
The installed removable crossmember, bolted into place, should look like this.
Flywheel bolts get a dressing with a red ‘thread locker before installation to ensure fastener security.

Flywheel bolts are then torqued to 85 ft-lbs in a crisscross fashion for uniform tightening in one-third values—28, then, 56, then the full 85 ft-lbs. Recheck your bolt torques.

Our MDL Superior brand clutches do not come off the boat from an offshore supplier.
We build every single one of them in-house for strict quality control. This is our Kevlar/Organic clutch disc for a sweet combination of connection and smooth operation.
When you make the right choice for street and weekend strip operation, you get an unbeatable clutch and flywheel combination that will serve you well for years to come.
MDL provides you with a clutch alignment tool in order to achieve a perfect clutch, pressure plate, and flywheel alignment for ease of installation and minimal wear and tear.
Clutch bolts get Loctite threadlocker and are tightened crisscross in one-third values to 35 ft-lbs of torque.
This means 11.6 ft-lbs of torque, then, 23.3, and finally 35. Again, check your bolt torque.
This is our GM Chevy bellhousing, which is virtually identical to original equipment with the proper bolt pattern.
Bolts get torqued to 25 ft-lbs.
Hydraulic release bearing dimensions are checked next and compared with the bell. The release bearing is adjusted to where it is firm against the clutch diaphragm fingers, but not where the clutch is disengaged.
We’re checking clutch lever depth to the mounting surface with a dial indicator.
The release bearing assembly is adjusted so there is .125-.150-inch of clearance.
As the clutch wears, the piston will move back over the lift path of the clutch. If you set it too tight, it will cause the clutch to slip.
How the hydraulic release bearing is indexed is of little concern to most installers, however, we prefer the guide/support pin be indexed at 5 o’clock as shown for best results.
Hydraulic lines should be routed as shown through the clutch fork opening with the supply (pressure) line on the bottom and the vent on top.

Images show TKO install it is the same for TKX
When you’ve properly aligned the clutch and checked to release bearing-to-clutch clearances, the TKX or TKO 500/600 should slide right into place.
If you experience any resistance or binding, stop the installation and recheck dimensions.
Installation should be smooth and is an unacceptable risk if it isn’t.
Check bellhousing alignment as well to prevent unnecessary side loads on the transmission input shaft and pilot bearing.


(pictured above is the TKO 600 for placement only the TKX mounts the same but has a much smaller case and contours than the TKO)
Because we have extensively engineered the TKX kit, installation in this C2 Corvette Roadster has been straightforward.
We do have the advantage of body-off for better access, which has made installation easier.
Driveshaft angle is checked next.

Because this is a fixed position driveline, there’s little concern over driveline angles because the shaft doesn’t have to articulate. Still, the driveline angle remains critical.
It must be checked if there has been any change to transmission and pinion angles.
Driveline angle as measure at the pinion.
We have some adjusting to do to get the driveline angle uniform at the transmission and pinion.
Checking driveline angle beginning at the pinion flange—adjusting it to the transmission tail shaft housing at the seal.
The pinion angle must be the same as the transmission tail shaft housing.
Here’s a closer look at the driveline angle as measure at the slip yoke.
A Word On Driveline Angles
In order to properly calculate driveline angles, add or subtract the component angles between the transmission, driveshaft, and the pinion, and on each side of the driveshaft.
The transmission and the differential are parallel as they should be. But, please understand, simple geometry guarantees the two operating angles will also be the same + or – 1 degree. Although we understand the operating angles are equal plus or minus 1 degree, we have to calculate operating angle (universal joints) to ascertain they’re within proper specifications. It is advisable to have a maximum of 4 degrees of driveline operating angle.
Because all of the angles are up, you need to subtract the smaller component angle from the larger component angle at each joint.
Next is the fabulous MDL hydraulic clutch system.
Using the firewall plate provided, mark the mounting holes to be drilled around the MDL clutch master.
The MDL clutch master cylinder mount is installed and good to go. With the mount in place, we’re ready to install the clutch master cylinder.
Use red thread locker on the bolt threads.
Our engineering people have fine-tuned this pedal-to-master cylinder linkage for perfectly smooth articulation.
You’re going to love the way this feels.
Although our Corvette Roadster body is off the chassis, the side-shift TKX shifter will come up right through this factory opening in the tunnel with no modifications.
No one will know there’s a TKX five-speed in the tunnel.
One Final Word…
Our C2/C3 Corvette TKX conversion kits come of extensive engineering where we’ve consulted with Corvette owners and enthusiasts for feedback on what they’ve wanted in a TKX conversion.
We listened and passed their comments and suggestions along to our in-house engineers who’ve spent time refining this kit. Once you’ve properly installed and adjusted your TKX, you will find the MDL TKO and hydraulic clutch package to be an extension of your own mind and body, so natural, that you will never go back to a Muncie four-speed and mechanical clutch again.
As always, our great in-house tech support team is ready to serve and happy to help. Our tech support team is the best in the industry.


